STEP-1 : Open Oracle Forms
Builder and Delete Defaults
1) Open
Oracle Forms Builder, When Forms
Builder starts, an empty form is automatically created named Module1. Select Forms
and open Template.fmb from your Developer
Suite installed directory (for me it’s: D:\DevSuiteHome_1\forms) and then save
it as ‘XX_MasterDetail.fmb’ in same directory.
2) Delete
the default Data Blocks (BLOCKNAME, DETAILBLOCK), Canvases (BLOCKNAME), Windows
(BLOCKNAME) and then Click save. By
default, Forms saves files in the \forms directory of your Developer Suite
installation. You may want to save it in a different directory; if desired, you
can create a new directory called MyForms in which to save the custom forms.
Fig : Before Deleting form Defaults
Fig : After Deleting form Defaults
STEP-2 : Creating
Windows and Canvases
1) Let’s first create a window. To
create a window, select the Windows node in the Object Navigator, then
click Create (‘+’ sign on the left toolbar).
2)
Once
the window is create then assign the proper properties as below :
Name : XX_MASTER_DETAIL_WIN
Subclass
Information : WINDOW
Title : Department-Employees
3)
Now
let’s create a content canvas. To create canvas, select the Canvases node in the Object Navigator, then
click Create (‘+’ sign on the left toolbar).
4)
Assign
the following properties to the newly created canvas.
Name : XX_MASTER_DETAIL_CAN
Canvas Type : Content
Subclass Information : CANVAS
Window : XX_MASTER_DETAIL_WIN
5)
Now
go to Window (XX_MASTER_DETAIL_WIN) and assign a Primary Canvas for it as
below.
6)
Go
to form level ‘PRE_FORM’ trigger and modify the code i.e. write your window
name as first window.
Similarly, got to APP_CUSTOM (Package
Body) and write your window name in place of <your first window>.
Fig : Pre-Form Trigger Code
Fig : App_Custom(Packae Body) Code
STEP-3 : Building Data
Blocks
We have to create one master and another details block for
master block. Here XX_Departments_Blk is master block and XX_Employees_Blk is
details block.
-- Building Master-Block and it’s Layout
1)
Select the Data
Blocks node in the Object Navigator,
then click Create (‘+’ sign on the left toolbar).
2)
Immediately,
the window for the new Data Block will pop up. Select “Use the Data Block
wizard” and click OK.
3)
Select
“table or view” as your data block type, and click Next.
4) Click
on browse button then immediately a pop up window will open for database
connection. Enter valid credentials and connect to database.
5) Select Departments table (XX_DEPT) and click
Refresh,then all department columns will appear under Available Columns list.
Click on double right arrow to move all columns under data block items. Then
clink Next.
6) On
click of ‘Next’ the next navigation window will be for creating master-detail
relationship but as XX_Departments_Blk block is master block so no need to
create relationship for this block. Thus Click Next.
Rename Data Block Name as ‘XX_Departments_Blk’,
Click Next.
7)
Select
Create the data block, then call Layout Wizard and click Finish.
Once you click Finish for Data Block Wizard then a new Layout
Wizard window will open where you can assign canvases for your data block items
and design the layout as tabular or form.
8)
Select
Canvas as ‘XX_MASTER_DETAIL_CAN’ and click Next.
9) Drag all your display items from Available Items section to Displayed Items section and click Next.
10) Check all your Prompt, Width, and Height. If you want to alter Prompt, Width, and Height then alter it and then click Next.
11) Select the display layout i.e. either Form or tabular. But as Departments is my master section so I will select form layout to display single record for it. Thus select Form and click Next.
12) Give
Frame Title : Departments
Records Displayed : 1
Click Next and then click Finish.
By now successfully
you have designed the Data Block and assigned data block items to corresponding
canvas. Now it’s time to arrange data block items on canvas as you want.
Once alignment of
items on canvas is done then let’s assigns Subclass Information for blocks and
items of blocks.
13) Select ‘XX_DEPARTMENTS_BLK’
and provide subclass ‘BLOCK’.
14) For all items DEPTNO,
DNAME and LOC of ‘XX_DEPARTMENTS_BLK’
block provide subclass information as ‘TEST_ITEM’.
15) Select frame of ‘XX_MASTER_DETAIL_CAN’
canvas assign subclass information as ‘FRAME_RECT’.
Now our Master-Block and its Layout is ready. Hence, let’s start with Child-Block.
--Building Child-Block and it’s Layout
1)
Follow
steps 1-4 of ‘Building Master-Block and it’s Layout’.
2)
Select
Employees table (XX_EMP) and click Refresh,then all employee columns will
appear under Available Columns list. Click on double right arrow to move all
columns under data block items. Then clink Next.
As Employees is our child block so we
have to create master-detail relationship for it. Thus, next step is creating
master-detail relationship.
3)
Remove
the check sign from the check button beside “Auto join data block”. Then click
on create relationship button.
4)
Select
“based on a join condition” as a relation type then click OK.
5)
Select
Department table as a related data block then click OK.
6)
Select
the name of the column in the Employee table under Detail item (FK name: DEPTNO),
and its name in the Department table under the Master item (PK name: DEPTNO). Check
the join condition if it’s correct then Check the Auto-join data blocks, click
next.
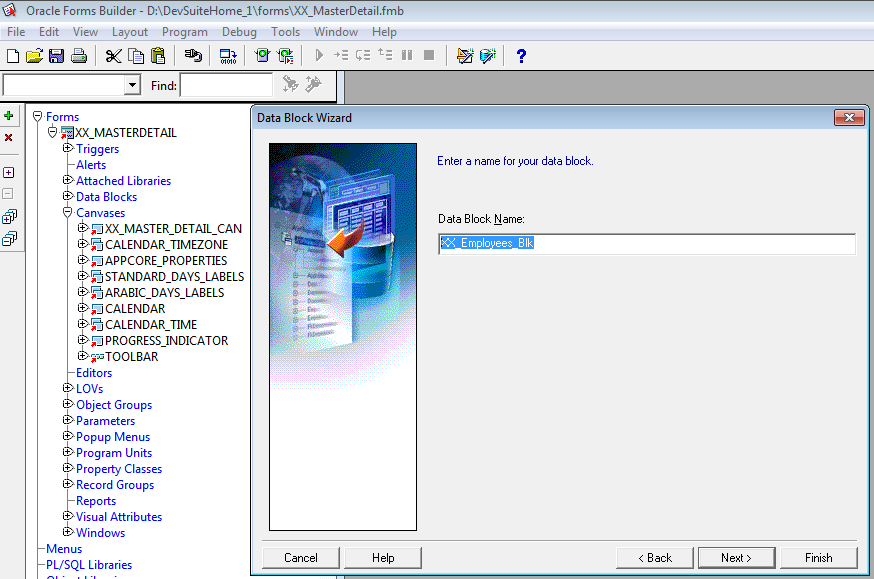
7)
Rename
Data Block Name as ‘XX_Employees_Blk, Click Next.
8)
Select
Create the data block, then call Layout Wizard and click Finish.
Once you click Finish for Data Block Wizard then a new Layout
Wizard window will open where you can assign canvases for your data block items
and design the layout as tabular or form.
9)
Select
Canvas as ‘XX_MASTER_DETAIL_CAN’ and click Next.
10) Drag whichever items you want to display from Available
Items section to Displayed Items section and click Next.
11) Check all your Prompt, Width, and Height. If you want to
alter Prompt, Width, and Height then alter it and then click Next.
12) As Employees is details section i.e.
for one master (Department) there can be many details (Employees) records thus
select Tabular layout and click Next.
13) Give
Frame Title : Employees
Records Displayed : 10
Click Next and then click Finish.
14) Assigns Subclass Information for
blocks and items of blocks as done for master block (Refer Steps 14,15,16 of
‘Building Master-Block and it’s Layout’).
Finally your form
layout should look like below –
Save your work and
compile the form.
There should not be
any error if you have followed all the steps correctly… :)
Congratulations!!!
You have successfully
designed a Master-Detail form. Now register your form in Oracle Apps and run
it. You will get an output window as :
Note : When you will create
Master-Details relationship you can see few triggers (ON- POPULATE-DETAILS,ON-CHECK-DELETE-MASTER)
will get automatically added for master (XX_DEPARTMENTS_BLK) block and a relationship will get created (XX_DEPARTMENTS__XX_EMPLOYEES_B).
If we will change the Delete
Record Behavior property, the triggers
will automatically change accordingly.
1. Non-Isolated :( Triggers are automatically
generated under the master data block)
a)
ON-POPULATE-DETAILS
b) ON-CHECK-DELETE-MASTER
2. Cascading :( Triggers are automatically generated under the
master data block)
a) ON-POPULATE-DETAILS
b) PRE-DELETE
3.
Isolated :( Triggers are automatically generated under the
master data block)
a) ON-POPULATE-DETAILS
What does the above three properties mean basically?
Non-Isolated : Prevents deletion of master record if detail record is
present.
Cascading : Deletes the detail
record once master record is deleted.
Isolated : Only deletes the
master record.
HAPPY LEARNING...!!!